Jon Chin
Your other chin
DIY cow USB flash drive
In: hardware
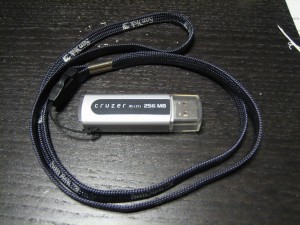
14 Oct 2008I saw some pictures of animal USB drives on the internet and thought it would be cool to make my own with a stuffed animal and a Sandisk Cruzer 256 mb drive I had laying around. Here is the usb drive and cow (sorry, I forgot to take a picture of the cow before I cut the seams of the head off).
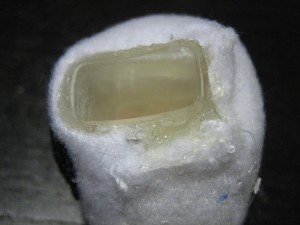
I had to cut the seams of the head as well as a couple seams in the back towards the tail. The cuts in the back are so the lanyard would have a place to come out. The next step is to take out some of the stuffing and fit the usb drive inside the body. You might need to take some of the stuffing out to make space for the drive so it doesn’t push itself out. The stuffing in this cow was particularly stiff (unlike cotton) so it had a lot of pressure at first. Once you get the pressure right, you’ll need to thread the lanyard through the hole in the back that you carved.
The next step is to glue the usb drive in so it doesn’t pop out. I used hot glue–at first I was afraid that it would damage the electronic components, but it seems to be fine. Pull the USB drive out a little bit and add a generous layer of hot glue all around the drive. Be sure not to put the glue too high because it will stop the cap from being able to attach. Apply the glue then push the drive down into the body and put pressure around the neck so the outsides are affixed with the glue. Do the same with the head.
And here’s the finished product (notice the light from the USB lights up when plugged in):
- (1) Comment
- Tags: chick-fil-a, cow, diy, drive, flash, usb
Fixing Error 550 when sending to/from Google Apps email
In: development
10 Oct 2008My problem was that whenever I sent an email from my boogly.net email (hosted by hostgator) to my email at celiacclub.com (email managed with Google Apps for domains), the message bounced, replying with this error:
550-Verification failed for <email>
550-No Such User Here
550 Sender verify failed (state 14).
It only happened for the boogly.net-to/from-celiacclub.com connection–emails from hotmail got through successfully. If your email isn’t working at all for communication with any email, refer to the Google Configuring MX records page and use dnstools.com to check your work. Also, make sure your SPF record is set correctly. At first I thought it was an issue because I’m running Google Apps for Domains. Thought something was misconfigured on my DNS. But it wasn’t. It took a while before I found the Gmail Troubleshooter. This told me that it was for sure the other host that was attempting to check that the user exists on Google Apps (This is supposed to help alleviate junk mail).
After exchanging emails with hostgator support, I found that the issue was with the hostgator servers’ configuration of localdomains/remotedomains. In other words, boogly.net thought that celiacclub.com was a local domain so it tried to look on its own system to validate that email address. You’ll need to modify your server’s awareness of the site. Here is a good tutorial about how to go about changing this. Of course, you’ll need to move from the localdomains to the remotedomains. Depending on your host, you might not be able to modify these files–in which case, you’ll need to get on the phone with their support and have them do this process.
- (1) Comment
- Tags: 550, gmail, Google, Google Apps, localdomains, remotedomains
My experience moving to slicehost from HostGator
In: development
4 Oct 2008It’s been 11 days since I’ve had a slicehost account, so I figured I would write about my experience with it. Slicehost is a Virtual Private Server (VPS) host that pretty much gives you webspace, an internet connection, and lets you do whatever you want with it. It’s nice to have the control…but that also means you need to configure it all yourself. I was nervous making the switch because it would mean more responsibility and more liability. It’s taken a lot of time to configure my slice (almost a week), but I think it was worth it.
Since I’m not extremely experienced with Linux, it took me a while to find my way around. You start off with a flavor of Linux installed on your slice (you can choose from Ubuntu, Fedora, Debian, and others). Then you log in and need to secure your server and add the functionality you need. I followed the tutorials at http://articles.slicehost.com and they were crystal clear. They were the best tutorials I’ve ever seen. I got up and running pretty fast. The problem was customizing certain parts of my server to optimize for my site. I also ran into some problems when I didn’t do things right.
Whenever I ran into problems, I would just go to http://chat.slicehost.com where there was always somebody there to help. It’s some of the best tech support I’ve ever gotten. I’d tell them my problem, then they’d usually ask me to check certain error logs, then they’d tell me what was wrong and how to solve it. So far I’ve probably taken 20 problems there and they solved 100% of them. That’s what I love the most about slicehost.
I still use HostGator–some of my websites can’t be transferred yet (too much hassle). I just had an issue today with my email that I needed to talk to their support about. I think my experience today was typical of how it’s been the past two years there. I used their liveperson chat client. Here’s the conversation(with boring content removed):
[hostgator]: Welcome to HostGator Live Chat, how may I assist you?
Jon: I have an email where all of the emails bounce[problem description]. here is the error:[error]
[hostgator]: Check to see if the mailbox is full.
Jon: it’s not
[hostgator]: That is an odd error. What email can I send a test to?
Jon: [email]
[hostgator]: Sent
Jon: I got your test email
[hostgator]: There has to be something wrong on the Google aps email that cant send out. On the Google aps account try repling back to me.
Jon: sent
[hostgator]: I got it. I am stumped on this. It is like that google aps account just cant send to that one account.
[hostgator]: I would suggest emailing support@hostgator.com to see if the admins can look into the email records and figure out the problem.
Jon: ok
[hostgator]: Sorry I could not help you.
[hostgator]: It confused me and I do not have access to the records.
[hostgator]: Is there anything else I can help you with?
Jon: no thats all
[hostgator]: Excellent, take care and have a great day!
[hostgator]: Thank you for using HostGator Live Chat! If you could take a minute to rate your experience with HostGator as well as my overall performance, that would help us to improve our customer service. To do that, just click the button that says “close” in the upper right hand corner. The survey takes less than a minute to fill out.
This support conversation was actually one of the pleasantest ones that I’ve had–others have been really bad. Here are the things that pretty much happens every time I talk to support:
1. First off, they blame it on somebody else. Here they blamed it on Google. In about 60% of my calls, they blame it on me and tell me that it might go away later.
2. They don’t really understand what your problem is. They usually always give me a “solution” that’s unrelated, which tells me that they’re telling you to do stuff before they really understand what’s going on.
3. They tell you “I can’t help you. I don’t have access to that. You’ll need to email support@hostgator.com”
Yea, I would always like to email support@hostgator.com first to get the support guys that actually have permissions to fix my problem. But the problem with that is that it takes them way too long to answer them. One time I had a huge server problem and I emailed them. Our email conversation went through this process: [hostgator]it’s not our fault, [me]yea it is, look at the logs, [hostgator]okay I changed xxx, [me]no it still doesn’t work, [hostgator]oh, I’ll change this [me]no, it still doesn’t work, [hostgator] it’s not our fault. That particular issue took 4 days to resolve. Email support would respond about 5-30 hours later. Meanwhile, I had customers calling me every hour or so.
Which is why I believe that slicehost will work a lot nicer. I wrote this article mostly to provide the advice I wish that I had, not to get referral points or whatnot. But if you do sign up for slicehost, I’d be appreciative if you use me as the referral by clicking this link–it won’t increase your price at all.
- (1) Comment
- Tags: experience, hostgator, hosting, linux, shared, slicehost, support, vps
Changing “wishlist” on Magento
In: development
29 Sep 2008I didn’t think it was fitting to call it a “wishlist” on CeliacClub.com. Frankly, if I went to any website with a wishlist, I’m not really sure what it does. I think calling it a “watchlist” is much more applicable. This article shows how to change it on your Magento site. This process could probably be adjusted to modify the other named aspects of Magento also.
1. We don’t want to mess with core Magento files so it’s best to modify the string translations. Edit the following CSV files (I like to edit them with a plaintext editor like Notepad++ but you could use Excel to do it):
- /app/locale/en_US/Mage_Wishlist.csv
- /app/locale/en_US/Mage_Adminhtml.csv
- /app/locale/en_US/Mage_Catalog.csv
- /app/locale/en_US/Mage_Checkout.csv
- /app/locale/en_US/Mage_Customer.csv
- /app/locale/en_US/Mage_Reports.csv
- /app/locale/en_US/Mage_Rss.csv
- /app/locale/en_US/Mage_Sales.csv
- /app/locale/en_US/Mage_tag.csv
With these csv translations, the original string is the first value on the line, indicated by quotation marks (or on the left side, if you’re using Excel). The replacement string is the value following it, separated by a comma (or on the right side, if you’re using Excel). You’ll need to use the “replace” function, but we need to be careful not to change any of the original string values–we only want to change the translation values. We also need to be careful to preserve the case of the strings–that’s why I use Notepad++ where I can match the case. Do a Replace search for “wishlist” and check the box for “match case”, replacing with “watchlist”. Don’t do a “Replace All”. You’ll need to individually replace each string, making sure to only change the second value on each line. After you’re done doing that, do it again, but for “Wishlist”.
2. We need to change the rewrite configuration of the URL so that requests for http://website.com/watchlist/ get referenced to http://website.com/wishlist/ . Unfortunately, I don’t have a solution for this yet. I spent 4+ hours on this but run into 404 errors that I think are caused by Magento. I’ll update this blog when I find a solution.
- No Comments
- Tags: htaccess, localization, Magento, string, wishlist
Configuring bridging on Westell modem
In: hardware
15 Sep 2008I wanted to set up my Verizon Westell modem so that my router has the IP address and does all the networking functionality. This makes administering my network easier. After searching the internet, I found that lots of people had this problem but there didn’t seem to be any clear answers. After spending a couple hours on the phone with tech support, I finally got it working. Here’s my setup:
phone line–>modem–>router–>wifi/ethernet
modem: Verizon DSL Westell 6100F (but any modem with the Verizon firmware should work)
router: Asus WL-520gu with DD-WRT firmware (but any router should work)
Here’s how I did it:
1. Use a pencil or other pointy object to hold the reset button on the modem for 30 seconds. This will restore the factory configuration so we can start fresh.
2. Connect the ethernet port of the modem directly to your computer. Make sure your computer is set up to acquire an IP address through DHCP.
3. In an internet browser, open 192.168.1.1/verizon/redirect.htm . This will bring you to a page that allows you to disable redirection. Click the “disable” button.
4. Browse to 192.168.1.1 . Now we need to set up the modem for bridge mode. Click “My Network” at the top, then “Network Connections” on the side. Click the “edit” icon for “Broadband DSL”. and then click the “edit” icon for “VCs”. This will bring you to a page that allows you to configure the bridging. Make sure that “Protocol” is set to “Bridge” and “Bridge mode” is set to “Bridge”. Make sure it’s not set to “Routed bridge”. That’s not what we want. Then click to apply changes, but don’t let the modem restart yet. We still have to change one more thing.
5. Click the “advanced” button at the top of the webpage. Then click the “Private LAN” link. The first checkbox should say something like “Enable DHCP server”. Uncheck that. We don’t want the modem dishing out IP addresses. Then click “apply” to save.
6. We’ll need to turn off the modem now. Turn it off. Turn of your router too. When we turn the modem back on, we won’t be able to connect to it any more to configure it. Unplug the cable connecting your modem to your computer and plug it into your router’s WAN port. At this point, I needed to call Verizon support to tell them to release my IP address. If you don’t do this, your modem will still try to take the IP address. I think you could get by without calling support by waiting a few days, but most likely you want internet now. =) After tech support is sure that the IP is released, power on your modem. Wait for the modem’s “DSL” light to turn solid green. Then turn on your router. If all went well, your router should now have an IP address given from Verizon. If not, read step 7.
7. (optional) If your router didn’t automatically get the new IP address, there’s a chance that it wasn’t configured the way we need it. I have my router configured to get the WAN through “Automatic Configuration – DHCP”. Yours might be different, depending on your router type. Then, you’ll likely want your router to be a DHCP server for your LAN–by doing this, any computer that connects to your network will be able to get an IP address and get on the internet right away.
Nutrition label creator
In: development
25 Aug 2008While working on the design for celiacclub.com, I found that I needed to create several nutrition labels, but couldn’t implement it dynamically. With the help of Jonathon Eric Cihlá?’s CSS, I wrote a PHP script to generate the code for the labels dynamically. You’ll need to unzip the files into a php-enabled directory. Here are the files:
nutritionmaker.zip
new blog
In: development|startup
25 Aug 2008I’m starting this blog to put some of the things that I’ve been discovering. Hopefully they’ll be useful to somebody. I just slapped in a theme I got off of wordpress.org and a few plugins.
About this blog
I'm Jon Chin. I love technology, food, and learning. I served a mission in the Philippines and loved it. You probably can't type on my keyboard because I don't have qwerty installed--I use Colemak. I'm obsessed with learning about North Korea and abandoned anything.
Photostream
Categories
- development (24)
- GrabContent (2)
- hardware (2)
- software (18)
- startup (9)
- Uncategorized (10)
- Ravi: Thanks. Its solve my problem. keep it up.:) [...]
- Nimesh: Hi Thnk u, because it is very useful and more important for cakephp understanding, [...]
- Mohini: Thanks for sharing this. This one really helped. [...]
- JRB: I just Photoshopped a new one from images I was able to find online when this happened to me. You ca [...]
- mayank: I really helpful [...]
- How to check Feedly (and other readers) for broken feeds
- How to give Google Analytics access for only single websites
- How to transfer Google Analytics account without losing data
- Checklist for transferring a website
- Sorting objects by django-secretballot votes
- Creating a Linux VirtualBox share
- Put birthdays on your Google Calendar
- Be up-front and filter quickly when outsourcing your work
- GrabContent–when you need quality writing fast
- LMGTFY now for 64 bit Linux


Recent Comments